Customer Activity

Customer Activity Overview

Customer Activity allows you to track user activity on the platform, record and save the Entry link place where the user first appeared on the website, and see within 10 pages where user were on the platform.

This activity determines where the user most often contacts the assistant and helps track activity.

❗❗❗Attention Customer activity is available only for Web Chat V2

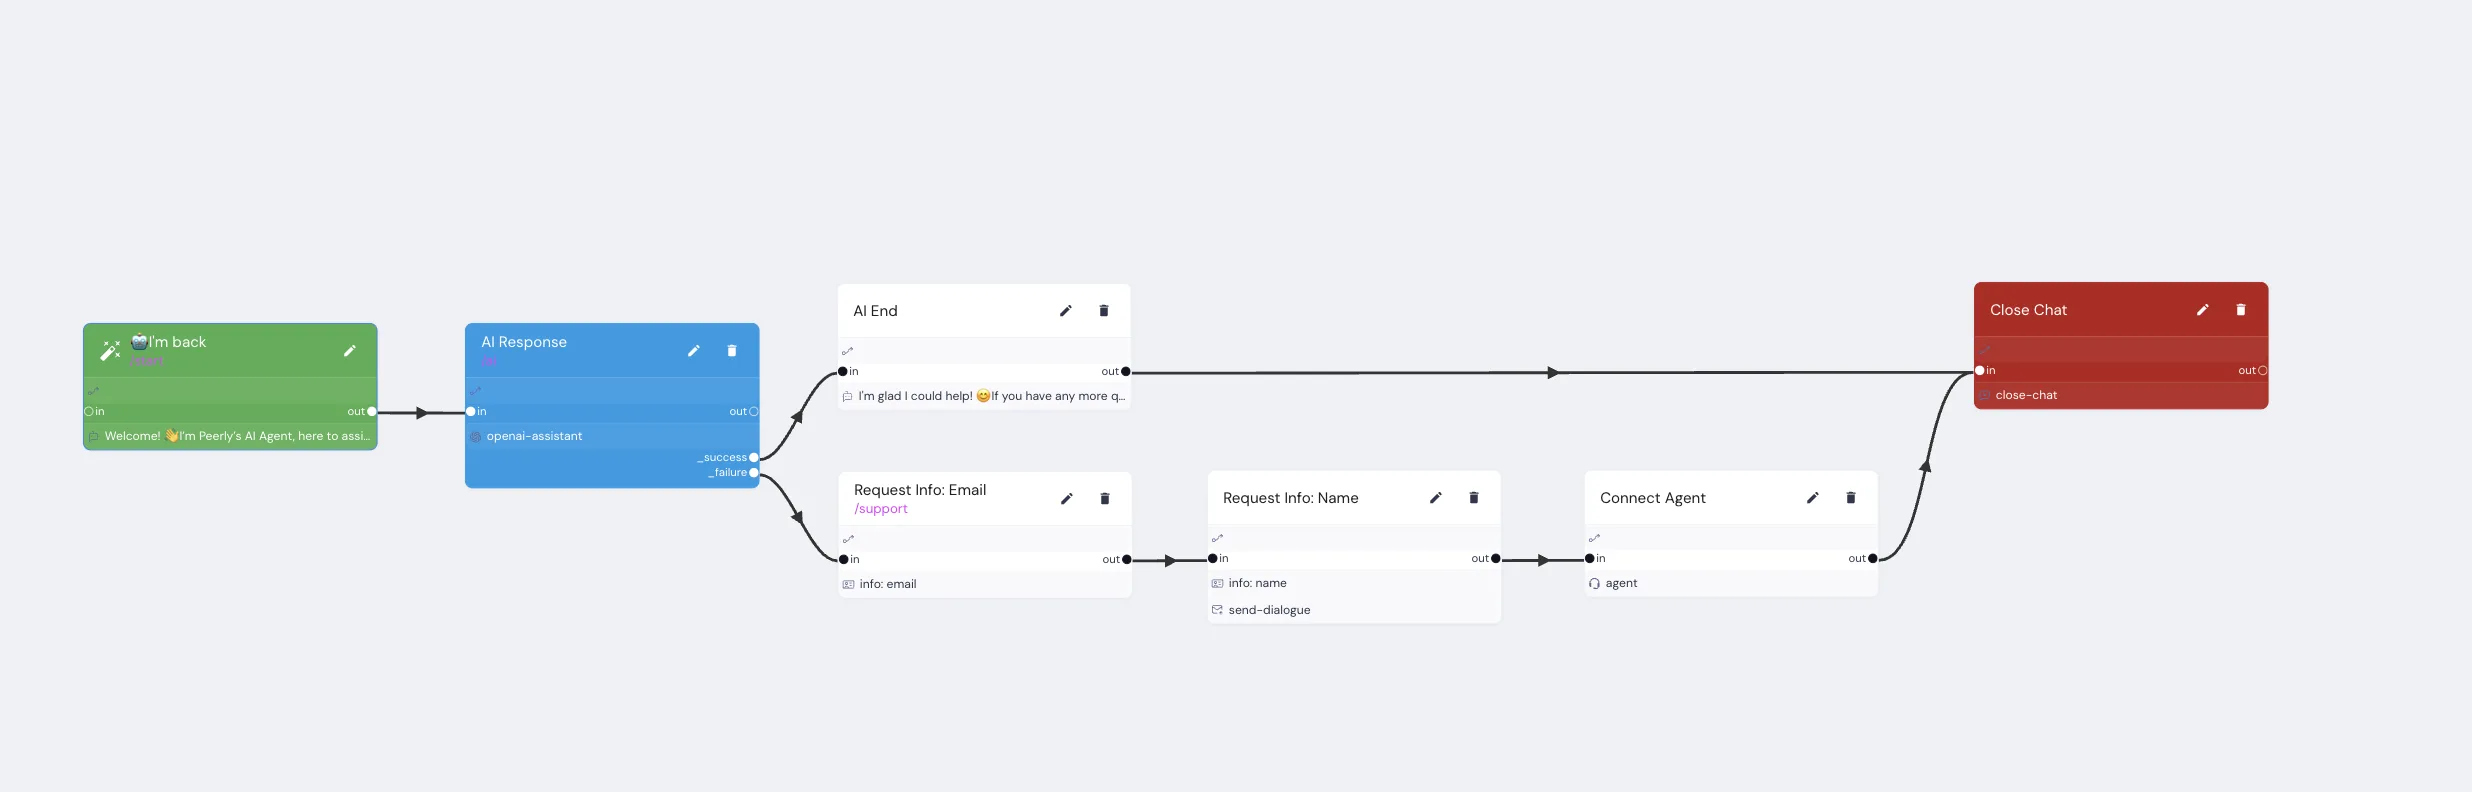
Where can you see it in Quidget

Navigate to Conversations → Select Chat from Web Chat integration → Customer Activity
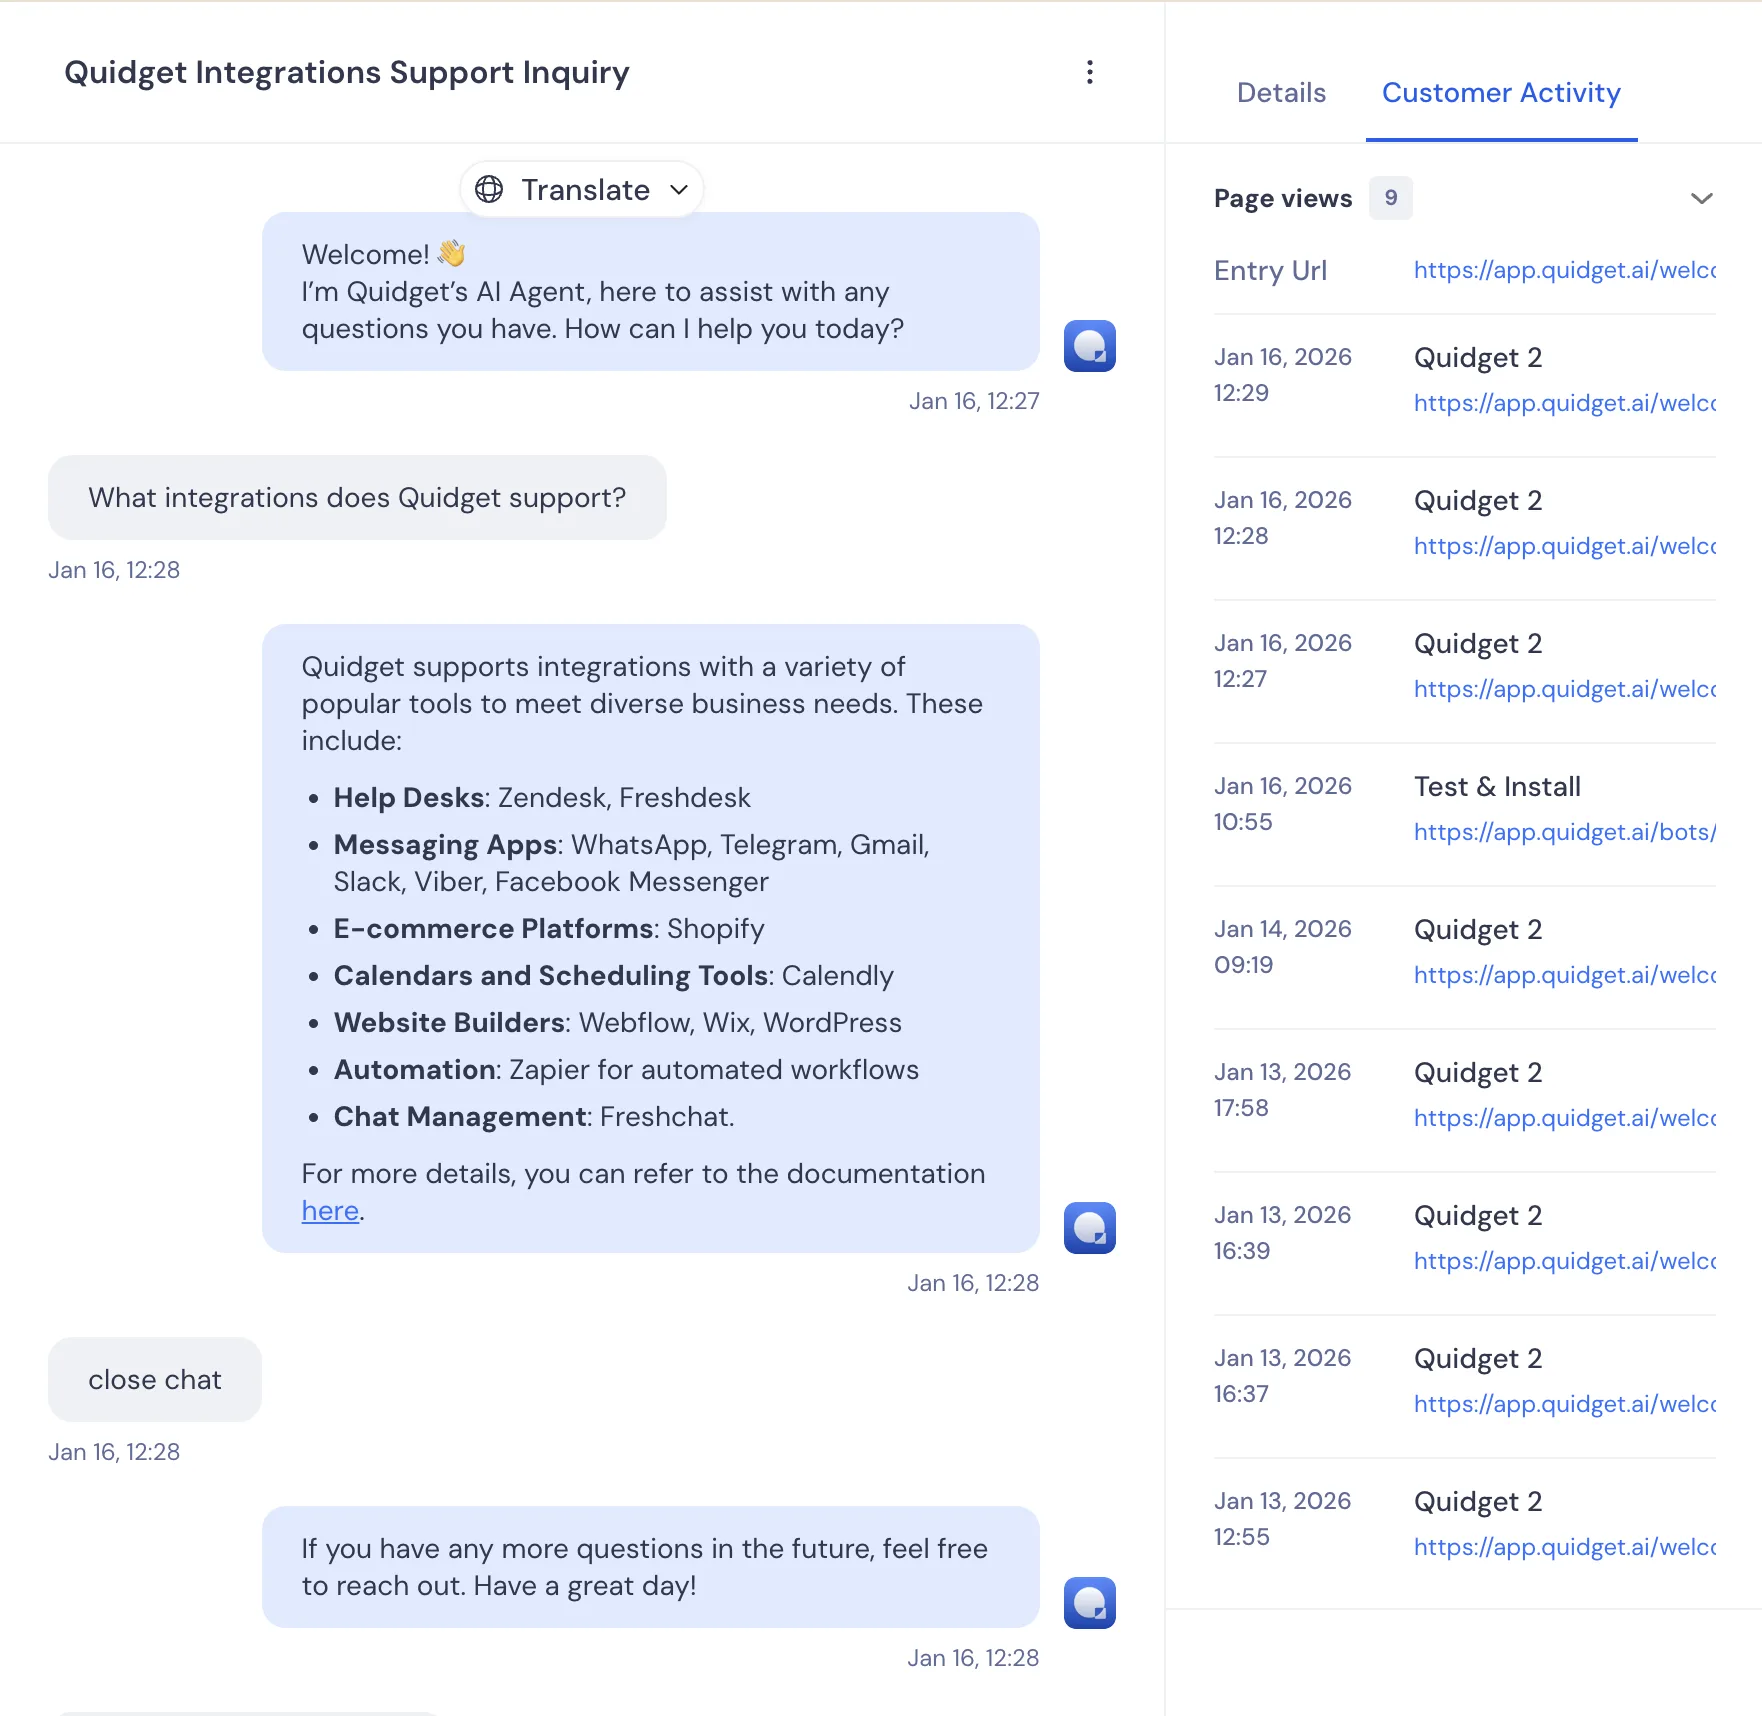
Entry URL

The URL of the page where the user first appeared on the website while the Web Chat widget was already available.

  • Captured before any interaction with the chat
  • Saved once per session
  • Represents the first page the user visited on the site, even if the user opens the chat later
  • Used to identify the original entry point of the user’s visit

Another Url in list

  • The URLs of pages where the user navigates during the same session, regardless of chat interaction.
  • Captured on every web chat connection
  • Triggered by:
    • Page refresh
    • Navigation to another page (for non-SPA websites)
  • Recorded even if the user does not interact with the chat

Example use case: Customer Activity → Zapier

Step 1: Connect Zapier with Quidget

Set up the Zapier integration following documentation:

Step 2: Use Customer Activity data in Zapier

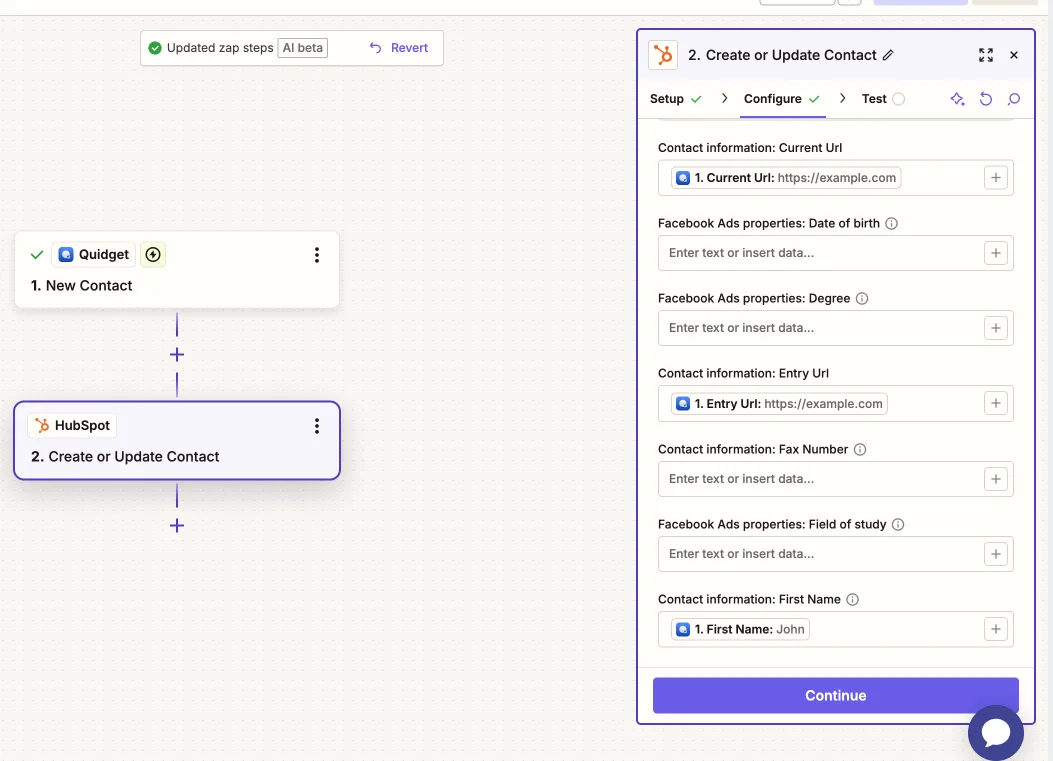
Step 3: Example in HubSpot, Set Up Action Step

  • Click the next step (Action) and select HubSpot.
  • Choose event “Create or Update Contact” as your action event.
  • Connect to your HubSpot account when prompted.

Step 4: Map Quidget Data to HubSpot

  • Zapier will automatically fetch available Quidget fields.
  • Click on each field in the desired HubSpot column.
  • Type / to quickly view and select Entry Url data field provided by Quidget.
  • Type / to quickly view and select Current Url data field provided by Quidget.

Fields added to Customer Activity

  • entryUrl — the page URL from which the user initializes the chat. Sent once, at chat initialization.
  • currentUrl — the page URL where the user is currently connected. Sent on every web chat connect (for example: page refresh, or navigation to a different page when the site is not an SPA).

Use these fields to understand the exact user entry points and navigational flow that led to assistant interactions.

Step 5: Test Your Integration

  • Click “Test” to validate your integration.
  • Zapier will automatically send test data to your HubSpot Sheet.
  • Verify your HubSpot updates immediately with sample data.

🔖 Quick Tip: Double-check your HubSpot to ensure data aligns correctly with your columns.

Step 6: Publish Your Zap

Step 7: Verify Integration Status in Quidget

  • Return to Quidget Dashboard → Integrations → Zapier → Zaps.
  • Check the Zap connection’s status; it should indicate “Active”.

Step 8: Integrate Zap into Your Quidget Flow

🎉 Congratulations!

Your Quidget-Zapier integration is successfully set up and running, simplifying your workflow by effortlessly recording in HubSpot Entry and Current user’s Url.

Manual actions (Developer note)

You can manually send action events from the host page into the Quidget iframe via postMessage. Currently only the pageview action is supported for manual sending. When sending pageview manually, you may change only the href and title fields of the future action payload.

Allowed manual action fields:

  • payload.data.href — string (URL)
  • payload.data.title — string (page title)

Example (send pageview manually):

const actionToIframe = setTimeout(() => {
    console.log('-----<> Action sending to Quidget');

    const iframe = document.getElementById('quidget-chat-iframe');
    iframe.contentWindow.postMessage(
        {
            origin: 'https://quidget.ai/webchat',
            action: 'actionEvent_quidget',
            payload: {
                action: 'pageview',
                data: {
                    // You can change the href and title to your own values
                    href: 'https://quidget.ai/', // window.location.href,
                    title: 'Your Test Title', // window.document.title,
                },
            },
        },
        '*',
    );

    console.log('-----<> Action sent to Quidget');
    clearTimeout(actionToIframe);
}, 3000)

Share this article

Tags

Using the Tags action

The Tags action allows you to attach tags to chats. Later, you can filter conversations by these tags for easier management and analysis.


Steps:

  1. Select or create the node where you want to add tags.
  2. Add the Tags action.
  3. Choose the action mode (StaticMessage, or AI).
  4. Configure the action based on the selected mode:
    • Static → Select or create static tags that will always be attached to the chat at this node.
    • Message → The message will automatically be saved as a tag.
    • AI → Provide a clear prompt for the AI to analyze the message and assign tags accordingly.
  5. Click Save.

Functions available in “Tags” action:

ModeDescription
STATICCreate or select existing static tags that will be permanently attached to the chat.
MESSAGEAutomatically tags the chat with any message sent in this node.
AIThe AI analyzes the message according to your prompt and assigns tags dynamically.

⚠️ Important: AI requires a clear and well-defined prompt; otherwise, it may hallucinate and assign many irrelevant tags.


Examples of usage:

1. MESSAGE mode | Tagging the first user action
When starting a chat, you may have suggested buttons (e.g., FirstSecondOther). You want to track which option the user clicked first.

  • Go to Flow → /start node
  • Add Action Tags → Select Message mode
  • Save.
    Now, the first user message will be saved as a tag in the chat.

Example: 


2.STATIC mode | Tracking forms
You want to filter chats by users who triggered a form (e.g., Flexible forms).

  • Go to Flow → the node with Action “Request Form”
  • Add Action Tags → Select Static mode
  • Add a static tag (e.g., request_form) → Save.
    Now, all chats where users requested the form will have the request_form tag attached.

Example: 


3.AI mode | AI-based tagging
You want AI to analyze messages and assign specific tags.

  • Go to Flow → AI Response (/ai) node
  • Add Action Tags → Select AI mode
  • Enter a clear prompt describing how tags should be applied → Save.
    Now, AI will analyze each message and assign tags automatically based on your rules.

Example: 


Where to use Tags?

Go to Sidebar → Conversations.

  • Open the Resolved or All conversations tab (tags are added only after the chat is closed).
  • Click the filter icon (next to search).
  • Select the tags you want to filter by.
    All chats will be filtered by the selected tag. 🎉

Example: 

Share this article

Auto Translate Feature

Auto Translate Feature

Inside flow, possible to enable automatic translation for supported languages.

To activate it:

  1. Open Flow page on the left side of the menu.
  2. Click the gear icon (⚙️) in the top-right corner to open Flow Settings.
  3. Check the box Auto translate to automatically translate content between languages.
  4. Click Save.

When enabled, Auto Translate will detect the user’s language and display the flow content accordingly.

Share this article

Creating a new node

Creating a new node

Overview

Creating a new bot and opening the Flow page displays an initial, pre-configured chatbot flow. This starter setup includes seven ready-to-use nodes, beginning with the /start node, which initiates the conversation.

The flow proceeds to an AI Response node. If the AI successfully resolves the user’s request, the chatbot transitions to a Close Chat (Success) node, completing the interaction.

If the AI cannot find a solution, the flow advances to a Request Node, where the bot collects the user’s email, name and prepares the conversation for human assistance. The next step is the Connect Agent (Human Handoff) node, which transfers the user to a live support agent. After the agent provides a resolution, the process concludes with a Close Chat (After Human Assistance) node.

How to Create a New Node

Follow these steps to add a new node to your chatbot flow:

  1. Open the Flow page.
  2. Hover your cursor over an existing node.
  3. You will see two buttons appear on the right side:”+” button (add a new node) “Duplicate” button (create a copy of the current node) To create a new node, click the “+” button.

Tip: Use the “Duplicate” button to quickly copy an existing node and its settings.

  1. In the window that opens, enter a clear name for your new node in the Node Name field. (This name helps you find and manage the node later.)
  2. Click Add action and select the desired action type (for example, select Message to send a text response).
  3. Fill in the details for the chosen action. For the Message action:
  4. Type the message you want your chatbot to send to users.
  5. When finished, click Save to add your new node.

Your newly created node appears connected to the previous node in the flow. You can drag the new node around to organize your flow clearly.

Share this article

Connecting Nodes

Connecting Nodes

Overview

Connecting nodes allows your chatbot conversation to move from one node to another, creating a logical conversation flow for users. Nodes can be connected using visual arrows that clearly show the chatbot’s path of interaction.

How to Connect Nodes

You can connect nodes in two ways.

Option 1: Drag and Drop Connection

Use this method to visually link nodes:

  1. Hover your mouse over the node you want to connect from.
  2. Click and hold the “Out” arrow that appears on the right side of this node.
  3. Drag the line to the “In” arrow of the node you want to connect to.
  4. Release the mouse button to complete the connection.
  5. Click Save.

This creates a visual connection (arrow line) between the two nodes.

Option 2: Using the “Go to node” Field

Use this method if you know the exact name of the node you want to connect:

  1. Select the node you want to connect from (click on it to open settings).
  2. Find the Go to node field.
  3. Enter the name of the node you wish to connect to.
  4. Click Add transition to create the connection automatically.

An arrow line displays to visually confirm the new connection.

Share this article

Adding Buttons

Adding Buttons to Messages

Buttons allow users to interact directly with your messages. With buttons, you can direct users to websites, open apps, or start specific actions like making purchases.


How to Add Buttons

Follow these steps to add buttons to your messages:

  1. Open the Message node you want to edit.
  2. Click the Keyboard icon.
  3. Choose the type of button from the available options.
  4. Enter the text you want displayed on the button.
  5. Click Save

Note: If you use a GO TO button, first create the related nodes.

Button Placement Options You have two ways to position buttons. The button position affects which button types you can use:

Inline: Buttons appear directly below the message text. Reply: Buttons appear under the user’s input field, typical in messaging apps like Telegram or Viber.

Selecting button placement does not affect WebChat.

Use different buttons depending on your scenario:

  1. Inline:
FunctionDescription
TEXTSend the text added to the “Value” field to the user.
URLSend the link added to the “Value” field to the user.
GO TOTransfer the user to the Node added to the “Value” field.
BACKTransfer the user to the previous Node.
  1. Reply
FunctionDescription
TEXTSend the text added to the “Value” field to the user.
GO TOTransfer the user to the Node added to the “Value” field.
PHONEGives an opportunity to share the phone.
LOCATIONProvides an opportunity to share the location.
BACKTransfer the user to the previous Node.
Share this article

Request info

Requesting information from user

The block “Request information from the user” is used to gather information from the user. This information can be used to personalize the user’s experience, to provide better recommendations, or to improve the product or service. The information that is requested can vary depending on the product or service, but it can include things like the user’s NAMEEMAILPHONE NUMBER and LOCATION.


Steps:

  1. Click the “Request Info” action.
  2. Enter the text of your message to the user.
  3. Add the text of your success message.
  4. Add the text of your error message.
  5. Click the “Save” button.
Share this article

Variables

Using variables in your messages

You can use variables in your messages to personalize them for your customers. For example, you could use the {{{customer.name}}} variable to include the customer’s name in your message. To see a list of available variables, click on the curly braces icon {}.


Steps:

  1. Enter the variable name in your message, surrounded by curly braces.
  2. Click the “Save” button.
Share this article

Webhooks

Using webhooks

A webhook is a simple way to send data to another application or service. It can be used to automate tasks, trigger actions, collect data, create dashboards, and build chatbots.


Steps:

  1. Click the “Webhook” action.
  2. Select the “Run” option (before or after).
  3. Select the “Method” (GET, POST, PUT, PATCH, DELETE).
  4. Enter the URL of the webhook.
  5. You may need to enter these Header values. You have the option to use the “+ Add Headers” button and fill in the “Key” and “Value” (for example, the API key).
  6. You will also need to enter Parameter values. To do this, you can use the button “+ Add Parameters” and fill in the “Key” and “Value” (for example, the data of longitude and latitude, city, age, etc.).
  7. Click the “Save” button.

The table provides information on the various methods and their descriptions.

MethodDescription
POSTCreates a new resource on the server.
GETRetrieves a resource from the server.
PUTUpdates an existing resource on the server.
PATCHUpdates a portion of an existing resource on the server.
DELETEDeletes a resource from the server.
Share this article