On the API keys section click the “Create new secret key” button
Create a Name of your new Secret key and click the “Create secret key” button
Click the “Copy” button to save the generated API secret key
Click the “Done” button
Go to the Quidget, to Connecting OpenAI interface, and paste the copied API key
Go to the Settings section, to the Organization subsection
Copy Organization ID
Go to the Quidget, to Connecting OpenAI interface, and paste the copied Organization ID. Click on the “Connect” button
Go to the Flow and create a new Node with the “Message” action
Under the typing field activate the “Use AI” checkbox
AI Assistants setup
Assistants offer users a range of functionalities, including answering questions, providing information, setting reminders, managing schedules, and performing various tasks through voice or text commands. They can help with decision-making, provide recommendations, and assist in navigating technology and services. Essentially, they streamline interactions with technology and enhance productivity by efficiently handling routine or complex tasks.
Creating OpenAI Assistant
You can create your own personal assistant and customize it to your specific needs. You can do this either directly in your OpenAI platform account or through the OpenAI integration in Quidget.
Go to the Assistants tab and create a new one with the parameters you need filled in
Go to the OpenAI Quidget Integration on the Assistants tab and select the one you need
Through integration into Quidget
Go to the Assistants tab
Click the “New Assistant” button
In the window that opens, enter all the parameters of the Assistant you need and close the window by clicking the side of the window (the newly created Assistant will already be in your list of Assistants)
Share this article
QCRM
Contents
Connecting QCRM
Here’s a detailed instruction on how to connect QCRM to Quidget:
Click on the Hamburger menu in the upper left corner
Go to the Integrations section in the Hamburger menu
On the Integration page, click the “Add” button
In the General section, select the “qbot2” integration from the drop-down list
In the General section, create an Integration Name and select Company from the drop-down list
In the Product section, activate the Select Product radio button
After saving the changes, go to the newly created integration and take the System ID from the URL field (currently the ID is displayed only after saving the integration with all data, so you can take any number to start with, and change it after saving the integration)
Go to the Connecting QCRM interface and paste the copied System ID (currently the ID is displayed only after saving the integration with all data, so you can enter any number to start with, and change it after saving the QCRM integration)
Ask the QCRM team members for the Secret Key and other necessary information as needed. Insert the received Secret Key in the QCRM Connecting interface and click on the “Connect” button
Click on the “Settings” button of the QCRM integration and copy the Integration ID
Go to the newly created QCRM integration and paste the copied ID into the Token field, in the Integration Settings section
Share this article
CoSupport
Contents
Connecting CoSupport
Here’s a detailed instruction on how to connect CoSupport to Quidget:
After registering on the quidget.ai, go to the “Settings” section of the bot. Proceed to the “Integrations” tab and click the “Connect” button for the CoSupport integration.
In the pop-up that appears, click the “Connect” button. You can also change the integration password if you wish
Once the integration is connected, click the “Settings” button for it and go to the “Knowledge Base” tab.
Create a “New Project” to continue configuring the integration further
After choosing the project name, click the “Create” button
Once the project is created, you can add document(s) to it to train the system with your information. Click on the File icon and Enter the Document name and Text for training AI. You can also upload a prepared file with the data you need (supported formats: *.txt, *.docx, *.xlsx, *.csv)
After making all the necessary changes, save them by clicking the “Save changes” button.
Next, you need to go to the Flow section and create a new Node by selecting the CoSupport Action.
Choose the project you require (there may be several), and the Node to which the flow bot will proceed after the interaction with CoSupport ends. Set “Timeout” to 0, and leave “Go to node” blank
For the integration to function properly, it is necessary to create an additional starting node to prepare a question for the AI. The “Timeout” should be set to 0, and the “Go to node” action should lead to a node with a CoSupport action
After completing the CoSupport AI integration setup, you can test its functionality by launching the corresponding Node in the Live Chat preview
Share this article
Zendesk
Contents
Connecting Zendesk
Here’s a detailed instruction on how to connect Zendesk to Quidget:
Open Zendesk website and log in or create a new account
After authorization/registration, go to the Admin panel from the Zendesk Products menu
Expand the Apps and integrations section, select the APIs subsection, and go to the Zendesk API page
On the Zendesk API page, agree to the terms of use and the Application Developer and API License Agreement, and click the “Get started” button
In the Settings tab, turn the switch to Enabled and click the “Add API token” button
After your previous steps, an API token will be created. Please note that you have only one opportunity to copy it, so be sure to save your API token! After successfully copying and saving the token, click the “Save” button.
Go to the Zendesk integration settings in the Quidget interface and click the “Connect” button
In the dialog box that opens, fill in the following information:
Account email – the email address of your Zendesk account
Token – the API token that was generated in the previous steps
Subdomain – take it from the link https://{subdomain}.zendesk.com of your account
After filling in all the data, click on the “Connect” button. Then go to the Credentials tab and click the “Set” button in the Webhook URL field!
After connecting the Zendesk integration, if necessary, you can verify the entered data in the Credentials tab and save the changes
How to set up Quidget Flow to work with Zendesk
After successful Freshchat integration, go to the Flow page
Move the mouse pointer over any node and click the “+” button – Create a new node
Click the edit button to go to the node settings
In the open node, click on the “+ Add action” button
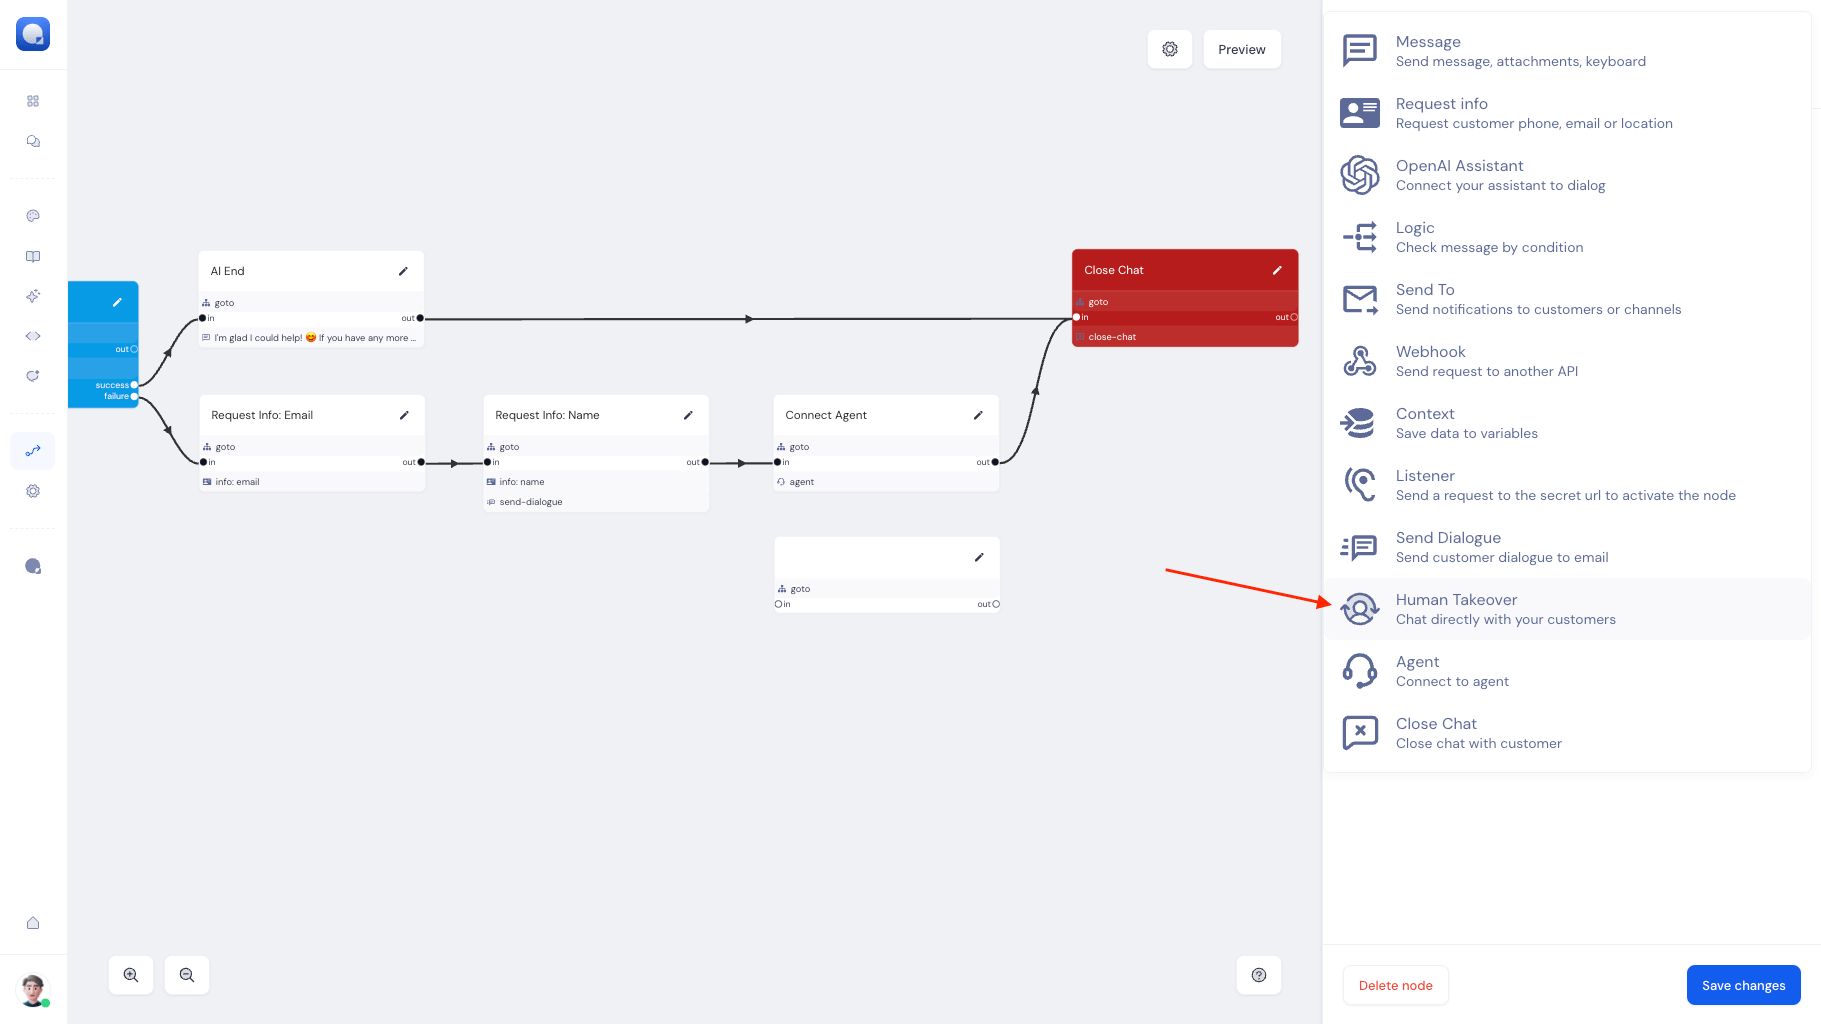
From the opened action menu, select Human Takeover
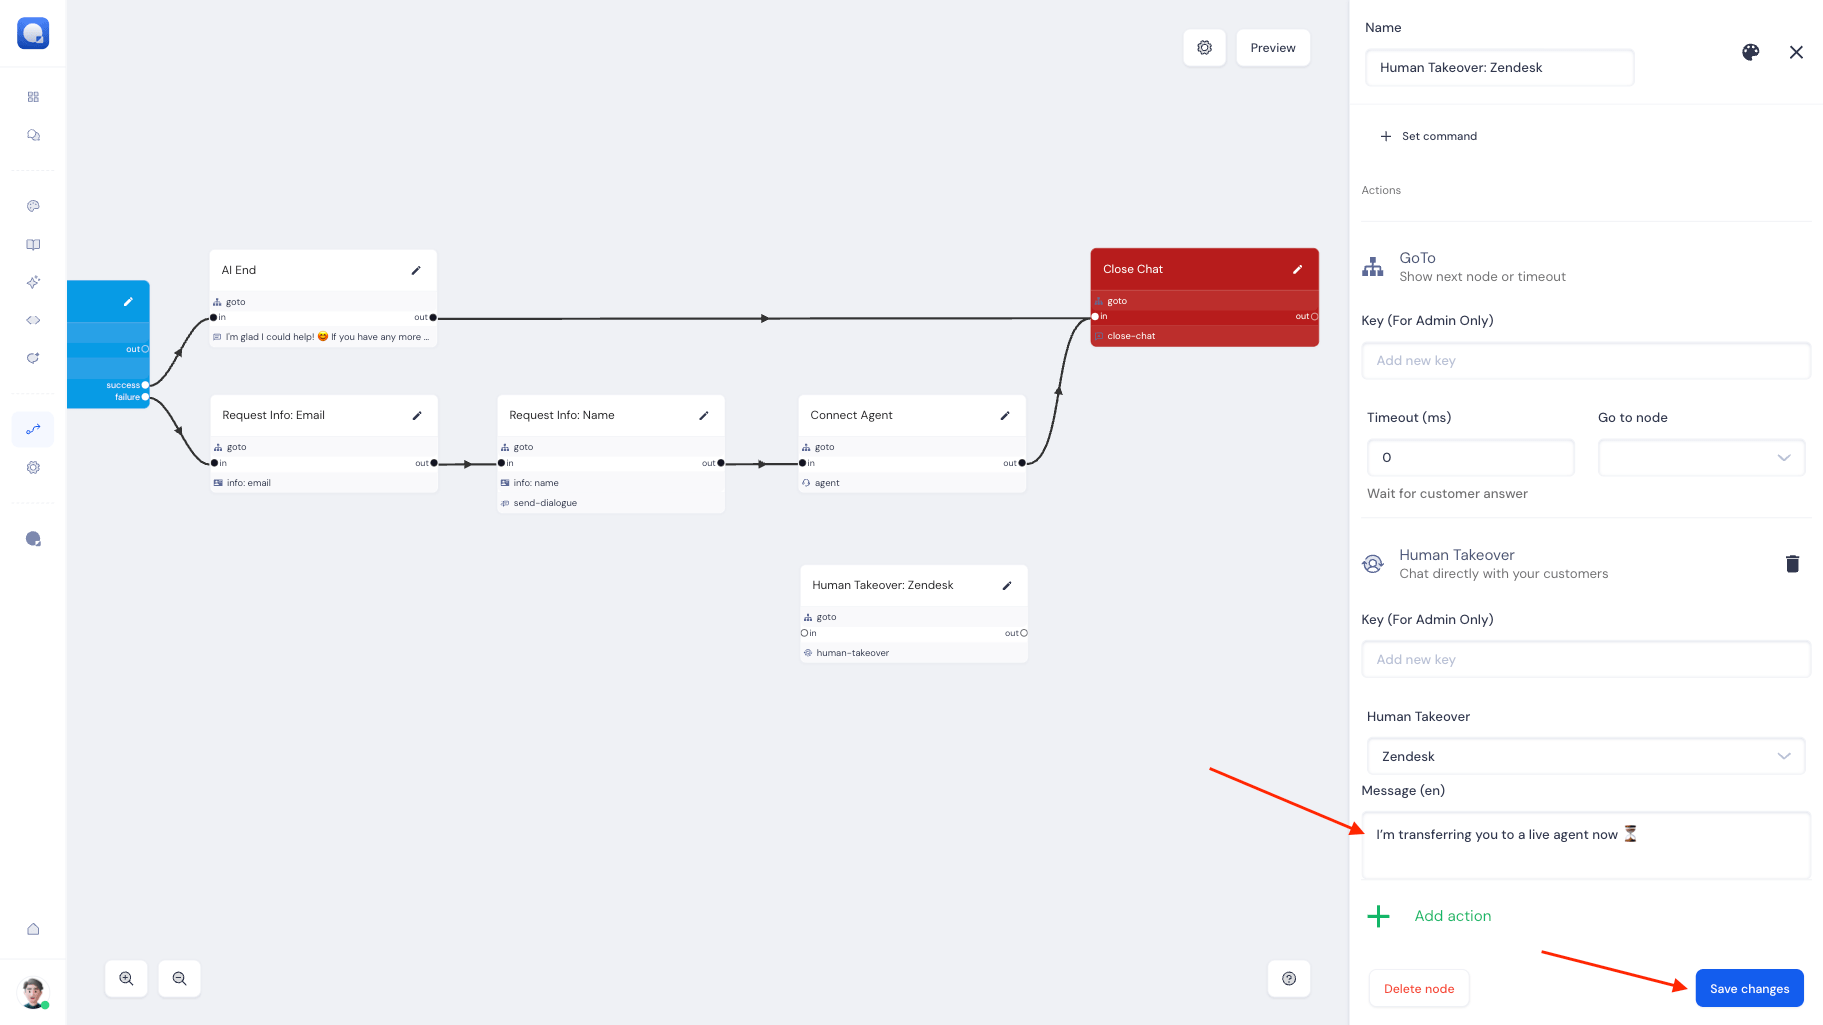
In the Human Takeover action, select the channel through which the messages should be sent
In the Human Takeover action, in the Message field, write the text that will be shown to the customer before connecting to the agent
Pair the created node containing the Human Takeover action with the flow you need
Share this article
Freshdesk
Contents
Connecting Freshdesk
Here’s a step-by-step guide on how to connect Freshdesk to Quidget:
After confirming your account via email, go to your Profile Settings by clicking on your avatar in the top-right corner of the Freshdesk dashboard.
In the profile menu, click Show API Key.
Copy the key — you’ll need it to connect Freshdesk to Quidget. ⚠️ Note: Keep your API Key secure.
From your browser’s address bar, copy your Freshdesk Subdomain from the URL — it looks like: https://{your-subdomain}.freshdesk.com
Open the Freshdesk integration settings in the Quidget interface and click the Connect Freshdesk button.
In the dialog that opens, fill in the following fields:
API Key — paste the API Key you copied earlier
Domain — paste your Freshdesk subdomain URL, e.g. yourcompany-name
Click Connect to complete the integration process.
After connecting Freshdesk to Quidget, you can verify or update your credentials at any time in the Credentials tab of the integration settings.
How to set up Quidget Flow to work with Freshdesk
After successful Freshdesk integration, go to the Flow page
Move the mouse pointer over any node and click the “+” button – Create a new node
Click the edit button to go to the node settings
In the open node, click on the “+ Add action” button
From the opened action menu, select Human Takeover
In the Human Takeover action, select the channel through which the messages should be sent
In the Human Takeover action, in the Message field, write the text that will be shown to the customer before connecting to the agent
Pair the created node containing the Human Takeover action with the flow you need
Once connected, your Quidget AI chatbot will be able to automatically create support tickets in Freshdesk for unresolved issues — ensuring a seamless transition between automated and human support.
Share this article
Freshchat
Contents
Connecting Freshchat
Before You Start
If you are using any other Freshworks product other than Freshchat, you need to take the following steps:
Log in to your system (for example, Freshdesk Omni).
Click on the Freshworks Switcher menu.
Select Freshchat from the list of available products and go to it.
Then continue using the following connection instructions ⬇️
Here’s a step-by-step guide on how to connect Freshchat to Quidget:
After confirming your account via email, go to the Admin Settings section in the Freshchat dashboard.
In the Admin Settings, find and open the API Settings section.
In “API details for chat” section click Generate Token for Your API Key and Copy after creation. This token will be used to connect Freshchat to Quidget.
Copy Your chat URL — you’ll also need this for the integration.
Open the Freshchat integration settings in the Quidget interface and click the Connect Freshchat button.
In the dialog that opens, fill in the following fields:
API Key — paste the Your API Key you generated earlier
Domain — paste Your chat URL
Click Connect to complete the integration process.
After connecting Freshchat to Quidget, you can verify or update your credentials later in the Credentials tab if needed.
In the Freshchat integration in the Quidget, on the Credentials tab, copy the Webhook URL by clicking on the link.
Go to the Admin Settings section in the Freshchat dashboard and search “API”. And open the Conversation Webhooks.
In the Webhook input field, paste the webhook you copied from the integration into the Quidget and click Save.
How to set up Quidget Flow to work with Freshchat
After successful Freshchat integration, go to the Flow page
Move the mouse pointer over any node and click the “+” button – Create a new node
Click the edit button to go to the node settings
In the open node, click on the “+ Add action” button
From the opened action menu, select Human Takeover
In the Human Takeover action, select the channel through which the messages should be sent
In the Human Takeover action, in the Message field, write the text that will be shown to the customer before connecting to the agent
Pair the created node containing the Human Takeover action with the flow you need
Once connected, your Quidget AI chatbot will be ready to hand off unresolved queries directly into your Freshchat inbox!
Share this article
Calendly
Contents
Connecting Calendly
Here’s a detailed instruction on how to connect Calendly to Quidget:
Go to the Calendly integration settings in the Quidget interface and click the “Connect” button
You’ll be taken to the Calendly login page. Log in to your account in a way that’s convenient for you
After logging in to your account, you’ll see a window about Connecting to Calendly. Click on the “Connect to Calendly” button
After clicking, the integration of your Calendly account with Quidget will happen automatically, and you will be redirected to the integration page in the Quidget interface, where the status will be “Connected”
Enjoy using it! 😉
Share this article
See the power of Quidget in 3 minutes
Explore what sets Quidget apart from
conventional AI Agents in 2025
Enter your business email to watch the demo
Invalid emaill address
Thank you!
We’ve just sent a 3-minute demo to your email.
Please check your spam if you don’t see it.